Skip to content

“Mary Jane’s Last Dance” by Tom Petty

    Difficulty: Easy – Intermediate

    Composer – Tom Petty

    Where to find this song – Greatest Hits, track #17

    Release Date – November 1993

    There will be two parts to this song. There are actually four phrases
    to the song, but two of them are identical. You will need to use a
    capo for this song. If you do not have one, it is suggested that you
    go buy one. You can get real cheap ones for about $3.00 and nicer ones
    from $10-25 at any music shop. They are very beneficial to a musician
    because they allow you to change the tone of your guitar and allow
    you endless possibilities to a very unique sound. Capo’s are very popular
    among folk and acoustic guitarists. You will need to place the capo
    on the very first fret.

    This song has a very loose feel to it. ( It is Tom Petty! ) Petty
    partially muted the strings in this song, but if you do not feel comfortable
    with it, just play around and you will probably find yourself doing
    it by default when trying to achieve the correct sound. If you are
    interested in partially muting the strings, that is done by resting
    your picking hand on the strings you aren’t playing very lightly. That
    should give your desired sound. Simple as that. Ok, on to the song.

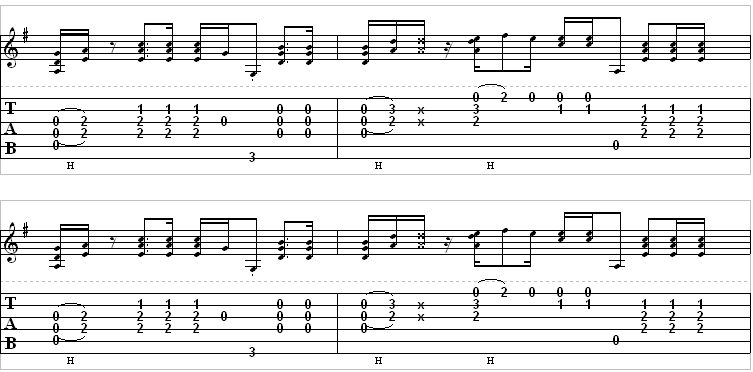
    Intro/ Verse Riff


    How To Play It

    Part 1

    Part 1 will teach you how to play some modified Am chords and a single “G” note.
    Tom Petty is known for his simplistic approach to music and somehow
    manages to still make the songs he writes sound very cool. To start
    off, you will need to play open notes on the “A,” D,” and “G” strings.
    Notice on the tab that there is a “hammer” on to the “D” string
    and the “G” string on the second frets of both strings. That
    is performed by playing the open strings once and immediately putting
    your fingers on the second frets of both the “D” and “G” strings.
    Try to use your middle finger on the “D” string and your
    ring finger on the “G” string. That will make it easier.
    Next, you just keep the two fingers that are already there and add
    your index finger to the “B” string and play that three times.
    After that, allow your fret hand to let off of all strings and just
    pick the open note ( “zero”) on the “G” string.
    Then, all you need to do is put any finger on the third fret on the “low
    E” string and then let the open notes on the “D” string,
    the “G” string, and the “B” string ring out. Part
    1 is done! Note: since you will be using a capo, all notes that are
    marked on the tablature should be read from the capo on the first fret
    being fret “zero.” What we mean by this is that you will
    count from the capo. If the capo were not there, you would count the
    first fret on the guitar as fret #1. However, since you ARE using a
    capo, you will not count that as fret #1 anymore. You will count the
    fret directly after the capo as fret #1. No matter where you put the
    capo in any song, always assume this.

    Part 2

    Ok, with the last part, you will need to pay a little closer detail to all notes. It isn’t hard, but is kind of tricky. Let’s begin. With your open strings starting this part out, you will do this just like you did the first phrase at the beginning. The only difference is that you will be playing a modified “D” chord directly after it. You will do this by placing your index finger on the “G” string on the second fret and your middle finger on the third fret on the “B” string. Play that once directly after you “hammered” on it and then perform a “rake.” ( When doing the rake, DO NOT move your fingers from where they are. Just lift them up until you can’t hear
    a specific note. You will need this chord in a second.) Remember, a “rake” is
    performed by scraping your pick or finger on the desired strings to be played. You will “rake” on the “G” string and the “B” string once. Now, this part is crazy. Play this part by pushing your fingers back down to where you can hear the note of that modified “D” chord again. Now, look at the tablature. Notice that after you play the modified “D” chord you will play and actual “D” chord. To achieve this all you need to do is play that modified “D” and make sure that this time you hit the “high E” string that is open. Then, just hammer onto the second fret of the “high E” string and you got it. Let off the “high E” string again and play the open note on that same string. Then you will want to move your index finger to fret one on the “B” string and play that note along with the “high E.” Leave the “high E” open and play it three times. Last, you will accent the “A” string by playing it open and then perform an Am chord just like you did in the second part of the first phrase. ( With your middle finger on the “D” string, your ring finger on the “G” string, and your index finger on the “B” string.)

    Tab

    Complete Transcription To “Mary Jane’s Last Dance” (PDF)

    Complete Transcription To “Mary Jane’s Last Dance” (Power Tab)