 |  |
When I bought my B.C. Rich, it came equipped with a Floyd Rose bridge. A whole different kind of animal. Of course, the Floyd Rose, or any of the more expensive floating bridges, has a locking nut at the top of the guitar to keep the whole thing tuned.
The advantage of this is that no matter how much you use your tremolo, it still stays in tune. On average, I need to tune the B.C. Rich once every five days or so. This is due only to the fact that the strings extend through use. Then, when I retune it, I only need to use the fine tuning keys. Once I lock the nut, I don’t have to unlock it until it’s time to change strings.
But how do you tune it? When I bought the guitar, I tried and tried and couldn’t get the damn thing to work. I ended up putting a few wooden blocks inside the bridge unit to keep it from moving and not using the locking the nut. Which meant I had to tune the guitar several times a day.
I asked a supposed expert who fixed guitars. He told me to use wooden block to keep the unit from moving, to tune the guitar, lock the nut and take off the wooden blocks. Then he said it would go out of tune the first time I used it. Seemed complicated. I’m sure glad I didn’t ask him to do any work on the guitar. If you ever hear this kind of advice, place both hands on your ears and… run like hell!
Once you know how, you realize it’s a very simple process. I’ll start off by explaining how to do it from scratch, but if you take good care of your guitar, you won’t need to go through all these steps the next time.
Strings
You should know first of all that you can’t use just any strings with a floating bridge. I particularly like Ernie Ball Slinky strings. They allow you to do all sorts of effects and they just have a good feel to them. Unfortunately, they’re no good with a floating bridge. Because of their elasticity, they can’t keep the bridge in position. Therefore, use these strings only on guitars with fixed bridges.
Also of note, if you change brands, you normally won’t have to reset the whole bridge, but if you change gauges (for example, go from ultra-light strings to light), you will have to reset the whole thing. This is because the different gauges place a different strain on the bridge unit. As the bridge must be parallel to the body of the guitar, going from ultra-light to light strings will mean less tension and the unit’s springs will have too much slack in them. Something to consider.
Resetting the Unit (time: 1 to 2 hours, depending on experience)
First things first, as you’ll be playing around the body of the guitar and so as not to harm the finish or get stuck on some of the hardware, remove all jewellery from hands and wrists: watches, rings, bracelets.
Tune the guitar with the old strings still on. Once this is done, look sideways at the bridge. It’s supposed to be parallel to the body of the guitar. If it’s leaning forward, then the springs aren’t tight enough. If it’s leaning backwards, the springs are too tight.
Screwing the Springs
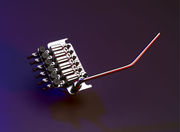
If the springs are too loose, start by loosening your strings so as not to break them when you add tension. If you’ve never done this or if your changing string gauge, unscrew the plastic plate at the back of the guitar which is behind the bridge. It should normally be a rather big, rectangular plate. Notice how many springs are there. There should be two to four. The less springs, the more flexibility. Mine has only two and I don’t need to apply much pressure on the bridge to get it moving. It’s great to cure you of the bad habit of resting your hand on the bridge.
Start by looking at the springs. They will be connected to a bar and it’s this bar that screws into the body of the guitar. This bar should be completely parallel to the side of the hole. Both springs must have the same tension in them. If not, start by loosening the one that’s screwed in tightest until it’s parallel.
Remember that even if the unit is made of steel, it’s still delicate. Tighten (or loosen) the strings gently. Quarter turns only! Tighten (or loosen) one screw a quarter turn, then do the same to the other. Tighten (or loosen) until the tremolo unit is parallel to the body. Then, retune the guitar using, again, the tuning pegs. Recheck the bridge. Again, if it’s not parallel to the body, readjust the springs. Continue doing this until the guitar is tuned and the bridge is parallel to the body of the guitar.
Changing the Strings
Now is the time to change the strings. If you do so before adjusting the bridge, you’ll have to spend many hours going by trial and error trying to adjust the bridge. And you’ll most likely break a string or two. Unlock the nut. You do not need to completely remove each block. At the bridge: loosen all the fine tuning screws. Once you’re ready to use these, you won’t need to loosen these screws, only tighten them. So loosen them all the way.
Completely at the back of the bridge and parallel to the body of the guitar, will be six (or seven if your guitar has seven strings) long screws which require an Allen wrench to loosen and tighten. Before you touch these, loosen the strings using the tuning pegs as you would normally do. Then, using the right sized Allen wrench, unscrew the long screws. These will move little plates which will free the ends of the strings. Take note that you should change strings one at a time or else you’ll end up placing too much strain on the unit and the strings when restringing.
Notice the end of the string which was blocked this way. It does not have a ball at the end, nor is it the end of the string that you can cut off. What you do is you take your new string and, using some cutters, cut off the ball end before the place where the wire around the ball end starts twining with the spring.
Use this cut-off end to place into the bridge block and tighten the screw. Be careful. Although the screw must be tightly in place don’t over-tighten it. These screws are, of course, replaceable, but no use wearing them out for no reason. And if you strip the inside of it, you’ll find it’s not too pleasant to remove it with a pair of pliers without harming the finish of the guitar. As with any other piece of the guitar, if it’s an expensive guitar which you intend to bring to the vintage stage, keep any parts you’ve replaced, you’ll need all the original parts, even if they’re worn for reselling it to a collector.
Regular Tuning
This is what you’ll need to do the next times. Unless you change string gauges, you shouldn’t have to readjust the bridge springs.
Once the guitar is perfectly tuned, lock the nut at the end of the neck. If you strum the strings, you’ll notice that it’s now untuned. Don’t worry, this is normal. Retune it, using the fine-tuning pins located on the bridge. The small E string is the one which will need the most tuning. Always tune starting with the smallest string and work your way up. Once you’ve finished go back and retune the first, second, etc. The first time you do this, you’ll probably have to tune it about five times. This is normal. Once all the strings are tuned, you’re ready to play. The first couple of days, you’ll have to tune it several times, this is just because the strings are new and they’re expanding.
By the time the fine-tuning screws are all the way in, don’t bother retuning from the pegs, it’ll more than likely be time to change the strings.
A-J Charron