Lesson 1
Here’s the tab to what will be covered in this first lesson:

Notice in the first measure, we have a measure of 3/4 time and then the second measure is 4/4 time. So this first measure only gets three beats, whereas the second measure gets four beats.
Basically, you can form a G-chord, Am7, G/B-chord and that’s the first measure and the second measure we’re going to form a weird G-chord. Now, use your thumb to play the bottom note on low E, then we’ll go to the A-chord, with the A-note, the G/B-chord, that’ll be your thumb, and then when we slide up to that G-chord up there, that tenth fret note, on the A string, you’ll use your thumb. For notes on the B-string, you can use your second finger. For notes on the G-string use your first finger.
In the first measure you’ll notice when we hit that G/B chord fragment, we’re gonna slide the whole shape up the fretboard. I’m picking the B-note with my second finger, third fret low E with my thumb. While that’s ringing I’m going to hit that G-string open, with my first finger. Then I’m going to switch to the Am7. Then we slide it all the way up for the second measure. You can put your first finger on the tenth fret. Use your pinkie for the twelfth fret on the B-string. And with the same fingers, fingerpicking, it’s just the same pattern twice. That’s the pattern. We’ll play that twice.
Notice that G-string is ringing throughout both measures, it’s the go-to note and really ties the moving chord shapes together. Now that G/B is probably best to go ahead and finger that third fret with your pinkie and that second fret with your first finger because when you slide it up you’re going to have the same fingerings for this chord shape. Or if you prefer, you can use your third finger there instead of your 4th finger. That’s just a matter of preference.
So that is the very first part of Blackbird, and this is a recurring theme in the song. This is the first of six major parts we’ll be learning.
Lesson 2
This is a very neat little riff. Here’s the tab from the video of lesson 2:

Okay, for this particular part in Blackbird, we’re gonna fret all the notes with our first finger (pointer) and our fourth finger (pinkie). All the notes on the A-string, we’re going to use our first finger, and all the notes on the B-string, we’re going to use our pinkie. Or you can substitute your third finger, but you’re probably going to find out that it’s not going to be possible because you’ve got such a widespread of notes, so it’s best to just go ahead and use your pinkie. And you’ll definitely see why once we get into this.
Again, we’ve got that recurring G-string, it’s open. We’ll fingerpick those notes on the G-string with our first finger, the notes on the A-string we’ll use our thumb and the notes on the B-string we’ll use our second finger.
Now, what we’re going to do, is we’re going to play this moving series of two-note patterns. Basically an interval mini-chord.
We’re going to add that G-string in between each of the chord shapes. That’s in the first two measures, and in the last two measures, we’re going to add a little bit more finger picking there. You’ve got to make sure your finger here doesn’t fall across the strings and deaden that G-string.
So if we put all four measures together, we have a very neat little riff, very creative. And really not terribly hard. A lot of people are going to have trouble with those wide chord shapes, and it is very fluid, it’s moving around a lot. But when you’re only playing a couple notes at a time it’s really a good primer for that picking hand.
Lesson 3
Now for this next part of Blackbird we have more of the same. That’s these measures right here that we’ll be looking at:

We’re going to use our first finger and pinkie again and the fingerpicking stays the same, thumb for the notes on the A-string, on the G-string we’ll use our first finger, and we’ll use our third finger for notes on the B-string.
You notice in measures two, three and four, the picking is all pretty much the same. It’s just these chord shapes that change.
Alright, if we look a little further we have three more measures here we’ll be looking at, we’re continuing our walk down. So we have a lot fewer notes to fret. We’re just going to use our first or second finger to do the second fret. And the picking stays the same. And of course, on the last measure, you’ll want to hit that low E, that third fret, you’ll want to pick that with your thumb.
I think once you kind of get the idea for the picking part from measures right here it’s similar to what we’ve done in the first two parts of this song. It’s just thumb, second finger, the first finger. Once you get that down I think the rest of it should be easy.
Lesson 4
More of the same pretty much. Here’s what we’ll be looking at in this lesson:

Let’s take a look at what these chords might be if we gave them a name. The first one would be a C. The second one would be that G/B. That’s an A, A-minor, and then G. And definitely in the second, third and fourth measures, it’s the same finger picking pattern we’ve been using we’ve got the one where we use the quarter notes in the first measure, this is quarter notes only. And then measures two, three and four have got the quarter note. And then we have these eighth notes that pop up in there. So the first notes are quarter notes and the last notes are quarter notes. And everything else in between is eighth notes. So that first set of notes will last for one and two and three and four and.
Lesson 5
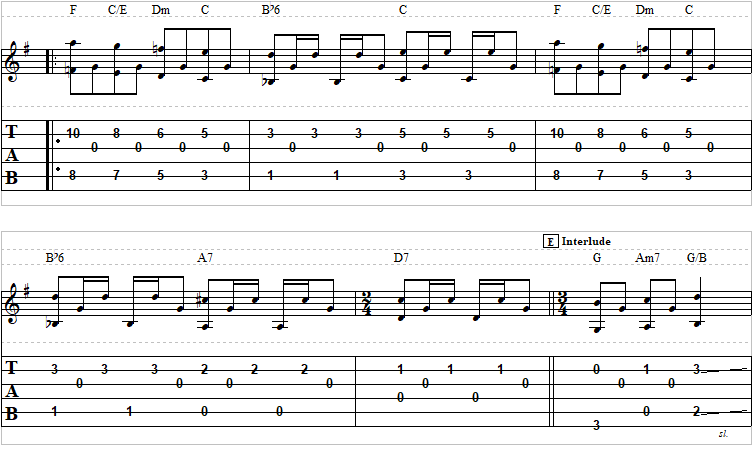
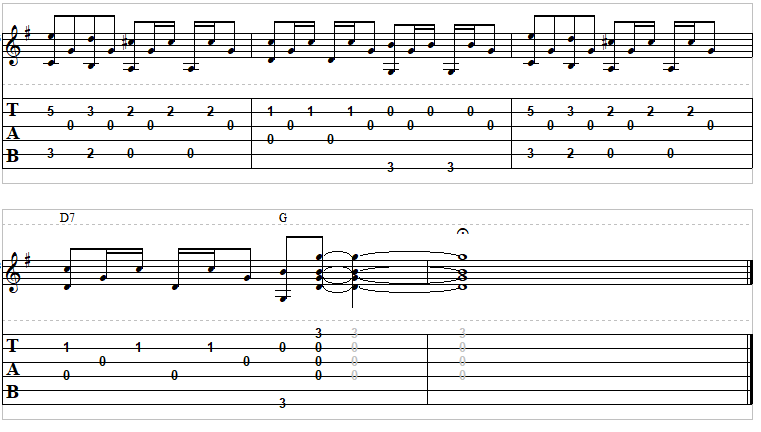
Now we’re going to look at the chorus. It is five measures long. It’s pretty similar to what we’ve already been doing. This whole thing has got quick fingerpicking. There’s lots of movement there:

If you’ll look here in the fifth measure we’ve got a measure of 2/4 so that’s only going to get two beats per measure. The rest of it’s in 4/4. For fretting, just keep your first finger on the A-string and your pinkie on that B-string and you’ll have no problem. Then the third measure, it starts to repeat. Then it changes up a little on the A. And then we’ll go to that fifth measure which is the D7. So if you’re having trouble with this song so far, just try to do, without all the fancy finger picking, just try the two note patterns. Try to get those and just play down those and then when you can do that you can try to add the rest. In the last measure, on that D-string, again you’re going to use that thumb to pick the A string notes.
Lesson 6
We’re going to look at the outro, which is the very end of the song. And then, after this lesson, and Blackbird Part 7, we’ll try to put it all together in a cohesive fashion. But in this lesson, we’re just going to take a quick look here at the very last few measures of the song, and it’s nothing that we haven’t already seen in the song:

Now hopefully, if you’ve followed this on the first five parts of Blackbird, this sixth segment won’t be too hard for you so I’m not going to go into too much detail on this. Just want to encourage you to look at this song and have fun learning it, because it’s a very creative song, and I think you can see why so many people love playing the song. For fingerstyle guitar, it’s a really fun song to play. It’s not terribly challenging, there’s a lot of other songs out there that are a lot harder. It’s something that a beginner or an intermediate player can sink their teeth into. And it’s still fun for advanced players to play too. So I would definitely encourage you to spend some time with the song and hopefully, you have been doing that through this series of lessons.