Composer – Kurt Cobain
Where to find this song – In Utero track #12
Release Date – September 1993
Ahh, Nirvana. The grunge rock band that our parents warned us about. Kurt Cobain has become an icon in the music world in many ways like John Lennon. His knack for creating some of the most popular riffs in history has given us musicians a reason to play. The band’s music is fun, and sometimes simple-but sometimes not so simple. The band, as we all know, had to end because of the supposed suicide/murder of their frontman, Kurt. The bass player, Krist Noveselic, is now a member of a band called Sweet 75, and their drummer was none other than the Foo Fighter lead guitarist and singer Dave Grohl. The band had to call it quits way too early, for obvious reasons, but their music will continue to inspire the likes of all musicians and music enthusiasts along the way.
Drop D Tuning
This song is in drop D tuning. In drop D tuning the low E string is tuned down one whole step to D. This enables the guitarist to play power chords with a single finger. If your favorite band uses drop D tuning and you want to experiment with this tuning, by all means, do so. Whatever you do, don’t learn the guitar in drop D tuning-you’ll get all mixed up.
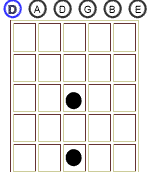
To tune your guitar to drop D tuning, first, make sure you are tuned to standard tuning. Then you’ll want to tune your low E string down two steps to D (we drop it down one step, hence the name). See the picture below. You can use the audio clip below to tune your low E string to D for drop D tuning.

Intro/Verse Riff

How To Play It
Part 1

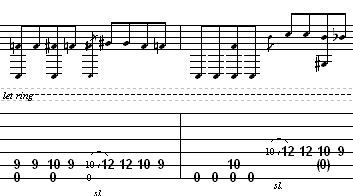
In the first two measures, you will find yourself very busy on the guitar. It is full of thick, rich tones. Though what you will be playing isn’t too difficult, there are some parts that you may see as difficult. This song’s catchy riff is very profound, and as for the most part Kurt Cobain played most of the band’s songs as himself being the only guitarist. To play the song, start off by placing your 1st finger on fret 9 on the “A” string and keep your finger there until otherwise notes. Now, strum one time. Next, you will need to just play the note that your 1st finger is on. It will be on the “A” string again. After you have done that, you will need to use your 2nd finger and put it on the “A” string on the tenth fret. After you have done that strum that once. If you notice, you are basically doing a “hammer”, but not with as much emphasis on the “hammer”. Then play and slide the “A” string from the tenth fret to the twelfth fret and play that twice. ( Still use your 2nd finger to slide to fret twelve, and lift off of your 1st finger.) After you have let off of your 1st finger, you will use that to play the tenth fret on the “A” string, then slide to the
ninth fret. The first measure is done. Practice that a few times to get the feel for it. The next measure is a little easier. You will do this by playing the “low E” twice open (remember that this string is actually tuned down to D, so we’ll call it low D from now on). After you have done that, place your 1st finger on the “A” string and play the tenth fret. Then play the open “low D” once. Now, look at the tablature. Notice that at the end of this measure, you are playing exactly what you played from the end of the first measure, just one string higher. ( There is an open “A” string note in there but that is pretty insignificant.) Remember to play that note, you will need to slide on the “D” string this time instead of the “A” string from the tenth fret to the twelfth fret and play that note twice. Then, you will need to play the tenth fret ( and play the open “A” string) on the “D” string, then slide to the ninth fret on that same string.
Part 2

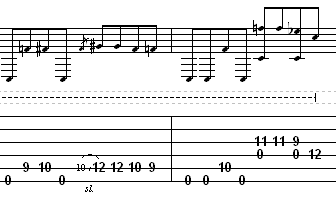
This part is almost identical to the first measure in the beginning, except you don’t play quite as much, and your focus is on the picking. The picking order to play this is: With your 1st finger, place it on fret 9 on the “A” string. Play the “low D” open and then play the “A” string at fret 9. Then play just like you did at the beginning and use your 2nd finger to hit the tenth fret on the “A” string. Play the open “low D” and proceed to the little riff just like you played on the first measure. The last measure is pretty easy, but the positioning of your fingers is of great importance. Start by picking twice the “low D” open string. Use your 2nd finger and play the tenth fret on the “A” string. Then play the open “low D” again. Here is where you have to watch your finger arrangement. The most effective way to make this song work at the end is by using your 2nd finger on the eleventh fret on the “G” string
and play it twice. Notice the open “D” string (not the low E string tuned down to D, but the actual open D string which is the 4th string) and play it accordingly. Now, after you have used your 2nd finger to play the eleventh fret on the “G” string, simply play it twice, and then use your 1st finger to play the ninth fret on the same string. ( Note the open “D” string again.) Finally, use your 2nd finger on the twelfth fret on the “D” string to finish off the song.
