A lead guitar is a guitar part that plays melody lines, instrumental fill passages, and guitar solos within a song structure.
What I’m going to show you, in a nutshell, is how to improvise a lead guitar part over any song.
It doesn’t matter what type of song it is, because the principles of music are the same for all of them. Sounds great right? But what do I mean by the word improvise?
Here’s the definition:
im·pro·vise (mpr-vz)
- To invent, compose, or perform with little or no preparation.
- To play or sing (music) extemporaneously, especially by inventing variations on a melody or creating new melodies in accordance with a set progression of chords.
As the definition says, you’ll be able to play lead guitar over any music in existence. Just follow the 4 easy steps in our tutorial:
Getting Started With Lead Guitar
First Things First
There are a few things that you must know before you can begin playing lead guitar on your own. These things involve a little theory, but I’ve done my best to try to keep it
simple as possible.
In order to play lead guitar on your own you must know 3 things:
- The name of the notes on your low E string
- The Pentatonic scale pattern
- How to find the key signature of a song
Print Resources
Now I don’t expect you to memorize the notes on the low E string in 30 minutes or less. All you really need to do right now is print out our cheat sheet. By using the diagram you can easily find the notes on the low E string.
This cheat sheet also includes item #2 which is the pentatonic scale pattern. We’ll talk about how to use this cheat sheet in Step 2, but for now, print out a couple of copies by following the link below:
Cheat-Sheet
Using The Cheat Sheet
Simply print out our “cheat sheet” and learn how to use it here.
Using The Notes On The Fretboard Diagram
The diagram below shows you all of the primary notes on the fretboard of the guitar. You’ll use it in order to identify the name of the key signature. In order to get a sharp (#) simply go up one fret. To get a flat (b) just go down one fret. For example F# (2nd fret, low E string)
would be one fret higher than F (1st fret, low E string).

Using The Scale Diagram
Open Position Diagrams
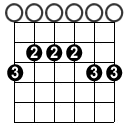
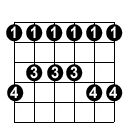
Scale diagrams are like a snapshot of your guitar’s fretboard showing 5 frets. The black dots show the scale pattern as it appears on the fretboard. The numbers in the black
dots show what fingers you should use to finger that note when practicing the scale. The white dots at the top are open strings.
Below is the G (pentatonic) scale pattern. It’s in the open position. You’ll notice that all six open strings are notes in the scale. To play this scale, start with the lowest note and play each note, one at a time in ascending order, and then back down again.
The numbers are the suggested fingerings. Since half the notes in the scale pattern are open strings, fingerings are quite simple.

While this may look similar to a chord diagram, it’s not played like a chord. You should practice playing it one note at a time. Start with the lowest note on the low E string and play up the scale until you get to the highest note, then go back down backward.
Movable Scale Diagram

Root Notes
You’ll notice that there are 12 different key signatures for each scale. That doesn’t mean you have to learn the scale 12 separate times. You only need to learn the different scale patterns. You simply have to move the patterns up or down the fretboard in order to change keys.
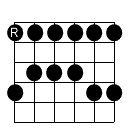
In the diagram below, you can see a visual representation of a pentatonic minor scale pattern. The root note of the scale is marked by an “R”.

Since the pattern is the same for any key we must simply match the root note to the note on the 6th string that matches the name of the key. See the chart below.
| Fret | 1 | 2 | 3 | 4 | 5 | 6 | 7 | 8 | 9 | 10 | 11 | 12 |
| Key | F | F#/Gb | G | G#/Ab | A | A#/Bb | B | C | C#/Db | D | D#/Eb | E |
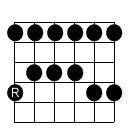
As scale pattern can have its root note in a different place other than the lowest note. This pentatonic major scale pattern has its root note in a place other than the lowest note. It’s the second note on the bottom string as illustrated below:

| Fret | 1 | 2 | 3 | 4 | 5 | 6 | 7 | 8 | 9 | 10 | 11 | 12 |
| Chord | – | – | (open) G | G#/Ab | A | A#/Bb | B | C | C#/Db | D | D#/Eb | E |
You’ve Got To Train Your Ears
Your best bet for learning how to determine a song’s key signature is to practice. In fact, it’s the only way you’ll ever truly know. Your ears have to be trained to know what to listen for.
Try listening to the radio with your guitar in hand and try to figure out the key signature for each song that plays. First, listen for a major or minor key and then try to determine the name of its key.
Putting It To Use
Here we’ll show you how to put all of your new lead guitar skills to use. Our goal in this tutorial has been to give you the power to play lead guitar over any song in any genre. At this point, you should use your new knowledge by practicing lead guitar over a variety of songs.
The best way to do this is to turn on the radio and play every song that comes on. All you have to do is find the key signature and apply the pentatonic pattern. You’ve got a cheat sheet so there are no excuses!