Exercise 1
Getting the hang of playing an alternating bass line while strumming takes a little practice. It’s well worth the effort! In this lesson, we’ll take our first small step towards this goal.
Below is the tab for our first alternating bass exercise. Use your thumb to pick each note. You should also count along to the beat with 1, 2, 3, 4, 1, 2, 3, 4 to help you keep time. Each note lasts one beat, then rest one beat, play the next note one beat, and then rest one beat.
For example, play the A string one beat, rest one beat, play the E string one beat, rest one beat, and repeat.
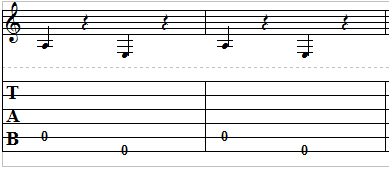
This bouncing bass line that we’re playing is the foundation of alternating bass. In most alternating bass lines we are simply changing the lowest note back and forth from the root note to the 5th.
In our example exercise, the bass line would be for an A chord. Don’t worry, this part will make more sense to you in a future step when we add the rest of the chord voicing.
The A note is our root note. It’s the lowest note and foundation of the chord. It’s 5th, being the 5th scale step in the A major scale, is E. So, for an A chord, we’ll alternate between A and E.
You can also try variations. Try alternating between the open D string and the open A string just like we did with A and E. Start on the D note. This would be for a D chord.
Next, try alternating between the C on the 3rd fret of the A string and the G on the 3rd fret of low E string. This would be an alternating bass line for a C chord.
Exercise 2
We’re going to play the same exercise this time around, but this time, you should also tap your foot and count along to the beat with 1, 2, 3, 4, 1, 2, 3, 4 to help you keep time. Each note lasts one beat, then rest one beat, play the next note one beat, and then rest one beat.
For example, play the A string one beat, rest one beat, play the E string one beat, rest one beat, and repeat.
Why The Same Exercise?
This exercise differs with the exercise in step one in that we want the emphasis on keeping time by tapping our foot. The timing of the alternating bass is of the utmost importance, so special attention to the matter is important:
Exercise 3
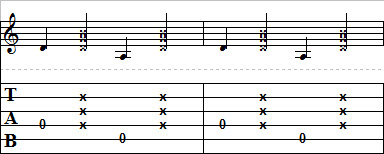
To break this down for you, play the A string on beat one, slap the strings on beat two, play the low E string on beat three, slap the strings on beat 4, and repeat over and over.
It doesn’t have to be a slap of the strings, you could simply pluck the open strings with a heavy mute. Whatever you want to do. The goal is to provide a percussive element without having to worry about what notes to fret.
See the little “x” on the B, G, and D strings. This is signifying the percussive strum that I’m talking about. We don’t want any notes to sound out during this part. We want more of a drum-like sound.
Keeping Time…
Keep tapping your foot while you’re playing the exercise. You can also count along- especially at first. Try the exercise at different speeds. What’s important is that once you pick a tempo that you stick to that tempo. Try not to rush or drag. That tapping foot should help keep you in line:
Exercise 4
In this exercise, instead of adding the percussive strum on beats 2 and 3, we’ll round out the chord voicing.
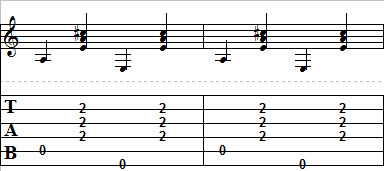
On beats 1 and 3 you’ll find the alternating bass and in between those notes is the rest of the implied chord. In this case, the implied chord is A. In beat one is a singular A note, beat 2 an A chord is strummed, beat 3 we play the 5th (which is E), and during beat 4 we play the A chord again. The perceived motion is derived from the bouncy bass line that alternates between A and E. The bass line is always the lowest note. In this case, it’s the open A and low E strings.
What we have at this point is the basic alternating bass strum pattern that can be used in a variety of music including blues, folk, and country.