This style is commonly played on steel string acoustic guitars. Pattern picking is the use of “preset right-hand pattern[s]” while fingerpicking, with the left hand fingering standard chords. This involves playing a steady bass pattern with the thumb and filling out some syncopated rhythms with the fingers of the right hand (assuming a right handed guitarist). It is a great accompaniment style for folk and ragtime music among other styles.
The essence of the Travis pattern is the steady bass against the syncopated figure played with the fingers. The use of the term “syncopated” is perhaps stretching it a bit. This term refers to a rhythm that is “off beat” with reference to the basic pulse. In this case the overall rhythm of the Travis pattern is not syncopated, however when you break the pattern down into its two elements, one part (played with the thumb) is on the beat, and the other part (played with the fingers) is sometimes in between the beat, hence the term syncopated. It is important to understand however, that when both thumb and finger are working together this should not produce a off beat jerky rhythm but instead a lively yet comfortable feeling groove with a steady pulse.
Give It A Try
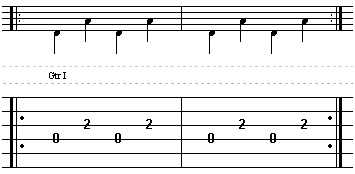
Get that steady bass going. The Travis picking pattern depends on the thumb laying down a steady pulse, over and over. This example uses a D chord. The Bass is alternating between the Fourth and Third strings. Practice the bass by itself over and over and over and over. The notation shows a repeat sign indicating that you should practice each step many times.
The most common pattern, sometimes broadly referred to as Travis picking after
Merle Travis, and popularized by Chet Atkins, Marcel Dadi and Tommy
Emmanuel, can be described as follows:
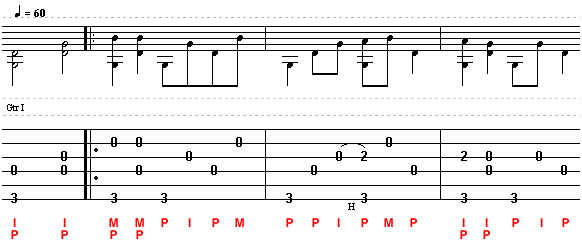
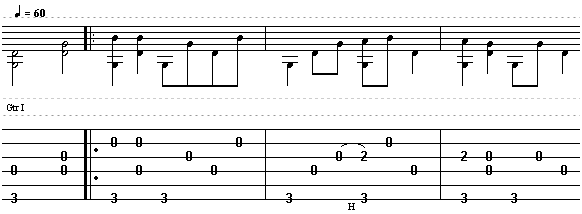
Here we have the basic tablature, and I have yet to include the PIMA for
it. For now let’s just look at it.
You’ll see that the entire passage is played either with half, quarter, or eighth
notes, but they’re spread around quite frequently. The only area that
uses half notes is the intro to the song. You’ll see the eighth notes
because they will be attached to each other. The quarter notes are
all alone on the tab.
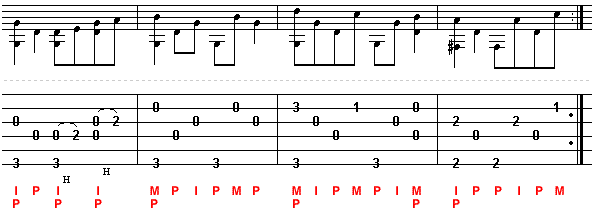
Now let’s see what you can do by adding the PIMA to it.
Tab With PIMA
Remember that PIMA stands for:
P = Pulgar = Thumb
I = Indice = Index finger
M = Medio = Middle finger
A = Anular = ring finger
By adding these letters as a template to know which finger to use, you can see
how much easier a given practice piece like this works.
The thumb (P) alternates between bass notes, often on two different strings,
while the index (I) and middle (M) fingers alternate between two treble
notes, usually on two different strings, most often the third, second
and first. Travis’ own playing was much more complicated and not limited
to simple patterns. He referred to his style of playing as “thumb picking”, possibly because the only pick he used when playing was a banjo thumb pick.


Try It!
Here is the video for the exercise above:
How did you do? Were you able to follow the appropriate fingerings as shown above?
If so, then you’ve definitely been paying attention! Trust me on this:
Using PIMA/TIMA will work wonders for your fingerstyle guitar playing.
Later in this course series I will show you how to logically apply
these letters by dissecting a given piece of music.


