Many of you may have already learned this, but it is part of learning how to apply percussive fingerstyle, and I think this is still one of the best songs to use this for. This actually USES the body of the guitar to create percussion as opposed to the “Aerial Boundaries” lesson that can be interpreted either way.
“More Than Words” by Extreme
I promise that I won’t throw too many ‘rock’ songs into this course, because we’ve all been there and done that. However, this one is a great way to master basic acoustic percussion. We’ll only focus on the basic Intro to the song to make sure we’ve got the theme down.
The percussive effect is produced by slapping your picking hand against the body of the guitar. You can either do this on the actual body, or you can do this on the fretboard where you are picking. That is what I would recommend doing for this song. It may take practice,
but if you remember to tap your foot on or around the 2nd and 4th beats of the tempo, it will help tremendously.
This Intro is played loosely. You DO NOT have to hit every single note found within the tablature. What you are really looking for is the chord progression changing and the rests on the staff. These rests are eighth rests, which means:
“A pause or rest having the time
duration of one eighth of the time duration of a whole rest.”
Here’s the tablature:
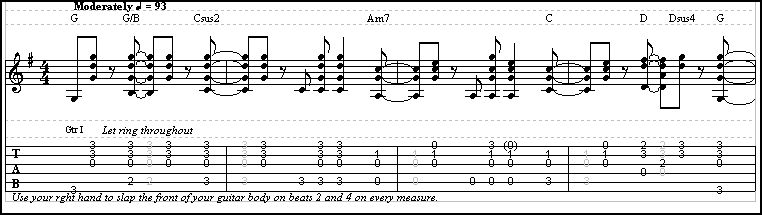
To play this like the actual recording, you
will need to tune to Eb, Ab, Db, Gb, Bb, and Eb.
Now let’s break this down into an easier segment:
Part I:
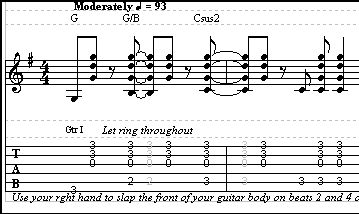
We start out with a G chord, and then we move to the G/B
chord, but notice that the G/B is really just a standard G chord without
the 3rd fretted note on the Low E string. You can get by with just
forming the standard G chord for the first two chords. The Csus2 chord
if you notice keeps the same high string formation, with emphasis on
the 3rd fret of the A string instead of our G formation played previously.
This continues throughout Part I. The video will show the proper rests.
Part II:
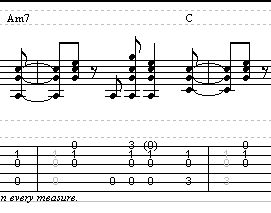
Part II picks up with the Am7 chord, which is basically
played until you see the C chord. One particular note of interest is
the added 3rd fret in the Am7 formation and then the almost immediate
removal of it. If you are struggling with this, you can omit it, but it won’t
sound quite right. However, you can still get the timing down without
it. After you have performed this part, play the C chord. There’s no
need to finger the 2nd fret on the D string unless it is more natural
for you to do so. Just be careful not to play it. End this part by
playing the highest three strings. The walking bass notes from the
Am7 are relative to your ability, so if you have trouble with this,
just try to strum it.
Part III:
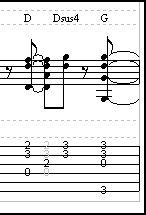
It’s just your standard D chord with a 3rd fret note added
on the High E string for ‘color’ and then your basic G chord again.
You repeat this theme over and over. Remember that I play the D chord
a little differently, but the choice is yours.