Composer – Neil Young
Where to find this song – Harvest track # 9
Release Date – February 1972
The Bio:
After Neil Young left the folk-rock band Buffalo Springfield in 1968, he slowly established himself as one of the most influential singer/songwriters of his generation. Young’s body of work is much like Bob Dylan’s in terms of depth, and he was able to hold his reputation as a solo artist, as well as record sales, for a longer period of time than even Dylan, partially because of his quirky work ethic-being – no work at all. Just honest music, from what many people believe to be the first true punk-grunge idol. Let’s not forget his influential role in Crosby, Stills, Nash, and Young!
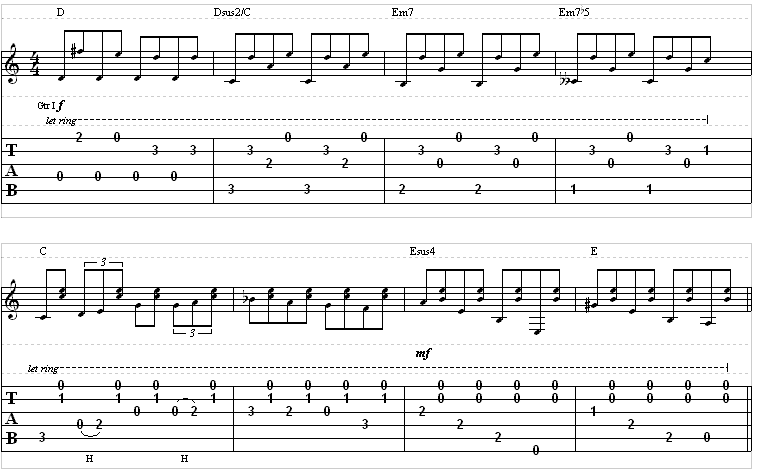
Intro/Interlude Riff
This is chord-based fingerpicking. You should form the chords at the beginning
of each measure and hold the chord form until the next chord form comes along
to allow each note to ring as long as possible.

The song itself isn’t difficult, but there are quite a few different chords. Begin the first measure by placing your 1st finger on the second fret on the “high E” string. Place your 2nd finger on the third fret on the “B” string. Play the second fret, and then play it open. Remember to allow the “D” string to remain open throughout and play accordingly. End the measure by playing the third fret on the “B” string.
For the second measure, use your thumb and wrap it around the top of the neck. Play the third fret on the “A” string. Use your 1st finger on the second fret on the “G” string, and use your 2nd finger on the third fret on the “B” string. Play this throughout the measure.
To play the third measure, use your 1st finger on the second fret on the “A” string, and your 3rd finger on the third fret on the “B” string. Play accordingly. For the fourth measure, you will need to just move your 1st finger to the first fret on the “A” string, and leave your other finger where it is. End the measure by using your 2nd finger on the first fret on the “B” string, or just barre the first fret once to end the measure, but make sure that you only play the appropriate string.

For the fifth measure, you will be playing a simple C chord, with a few hammer-ons
in between. The best way to do this would be by forming the C chord first. Do this by placing your 3rd finger on the third fret on the “A” string. Place your 2nd finger on the second fret on the “D” string. Place your 1st finger on the first fret on the “B” string. Now that you have done that, go ahead and remove your 2nd finger from the “D” string.
Now, play according to the tablature, and just place your 2nd finger down on the second fret when applicable. That will give you the hammer-on effect by default. To end the measure, now all you have to do is do that same thing with the second fret, but this time do it on the “G” string on the same frets.
For the sixth measure, you will need to use your 3rd finger on the third fret on the “G” string. Keep your 1st finger on the first fret on the “B” string. Next, just use your 2nd finger on the second fret on the “B” string. Play the same string open once, and then use your 3rd finger for the third fret on the “D” string.
For the seventh measure, barre your 1st finger on the second frets on the “A” string, the “D” string, and the “G” string. Play according to the tablature.
For the last measure, you will be playing an E chord. Do this by placing your 1st finger on the first fret on the “G” string. Placing your 2nd finger on the second fret on the “A” string, and placing your 3rd finger on the second fret on the “D” string. Pick accordingly, and you are finished!

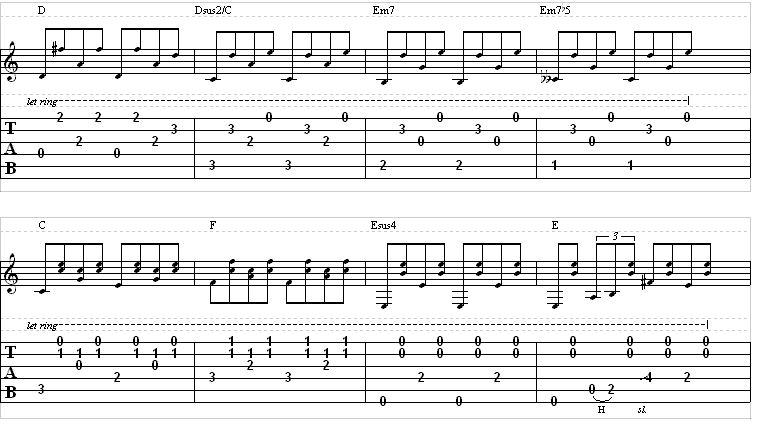
Verse
Remember that this is chord-based fingerpicking. You should form the chords at the beginning of each measure and hold the chord form until the next chord form comes along to allow each note to ring as long as possible.
The first four measures of the verse are quite similar to the first four measures of the intro. The last 4 measures, on the other hand, are quite different.

Outro
The last four measures of the song are a little bit different, but not much. The last measure slows down dramatically as indicated by the rit. above the staff. That’s an abbreviation for ritardando which means decelerate the pace or slow down.

Complete Transcription
Complete Transcription To “Needle And The Damage Done” (PDF)
Complete Transcription To “Needle And The Damage Done” (Power Tab)