First things first…
Strumming, for a guitarist, generally is used specifically to refer to when a guitarist loosely plays a series of basic guitar chords with the same rhythmic set of up and down strokes.
One common mistake among beginner guitarists is to use guitar strumming patterns in place of proper rhythmic control or to try to regulate any guitar into a strumming pattern. This is usually only used for more background rhythm parts, and shouldn’t be confused with acoustic guitar lessons on techniques that are intentionally more precise.
Loose vs. Sloppy
Strumming is usually a very loose style of guitar playing, but that isn’t the same as playing sloppy. The actual rhythm should still be precise, with the loose falling in the slight ability to hit or miss a couple of extra strings with each stroke. If the bottom three strings are targeted in a stroke, it is fine for only the bottom two sound, but if the stroke completely misses, then that should be taken as an indication that the playing is too sloppy.
Basic Eighth Note Strumming Pattern
The most basic strumming pattern used is the alteration of down and up strokes for eighth notes. From this basic pattern, a few different patterns can be made simply by leaving out some attacks in the guitar strumming pattern. Here are some examples:
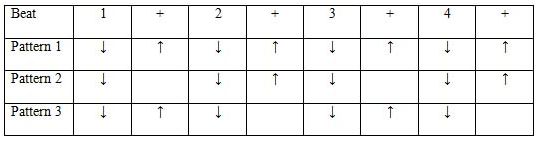
Pattern 1 – In relation to the beat, we have a simple ‘down up down up’ pattern over and over. The down is the 1, and the up is the ‘and’. An example of a song that could use this pattern, if played quite rigidly, would be “Across The Universe” by The Beatles. D, U, D, U, D, U, D, U with no rests to take up time in the pattern. Later I’ll show you why this song technically doesn’t fit in the basic pattern, but for now it will suffice.
Pattern 2 – In relation to the beat, we have another pattern that starts with the ‘down’, but this time, on the ‘and’ we don’t play anything. We then play another ‘down’ on the 2, and then an ‘up’ on the and. Repeat the ‘down’ on the 3, then nothing for the and – and finally a ‘down’ on the 4, followed by an ‘up’ on the and. If we were to count out in our standard way then it would look like this: D, rest, D, U, D, rest, D, U. Notice that there are still 8 total beats played, but the rest takes place of two of the beats.
Pattern 3 – Pattern three is actually much easier than it looks. What you have here is a ‘down’ on the 1, and ‘up’ on the and, a ‘down’ on the 2, and then a rest/nothing on the and again. Repeat this again and you have eight total beats. D, U, D, rest, D, U, D, rest. Again, two rests here.
The patterns shown here can be played using any of the basic guitar chords. The focus should be on developing an even rhythm and consistent flow of guitar strokes.
For the basic three patterns shown above, you may be asking, ‘but how will I know which one to use?’
That’s just it. Unless you learn to train your ear to hear the loose patterns found within a song, you really don’t know until you try it. In a way, learning about strumming patterns is the same as an ‘Average Joe’ learning Quantum Physics. The only way you’ll understand it is by being immersed in the subject.
More on that in a moment…
Strumming Stroke Timing
One common mistake that should be avoided is to use the stroke patterns as a way of maintaining timing. A guitarist should be able to place either stroke at any time for the desired attack. Down and up strokes do have a slightly different flavor to the sound, and sometimes it can sound better to use the same stroke twice rather than alternate.
The best way to develop the ability to use either attack on demand is to practice patterns that aren’t based around the basic down and up stroke pattern shown above. Below gives a few examples of strumming patterns to try out.
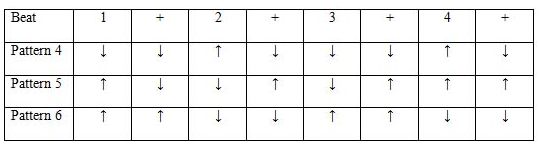
Pattern 4 – D, D, U, D, D, D, U, D is the pattern here. We’ve still got eight beats, with the counts showing as 1 and 2 and 3 and 4 and. Notice the pattern is actually the same over and over if you break it down. D, D, U, D / D, D, U, D.
As you can see, you’re really only learning the first four strums of this pattern. This is actually the case in most strumming patterns. I’ll get into the problem with that in a moment.
Pattern 5 – U, D, D, U, D, U, U, U is a different pattern than you may be used to. In it, we don’t have a repeating pattern if you break it down into 4’s.
We have U, D, D, U / D, U, U, U instead. Have you ever seen a pattern USED like this? One that makes sense to strum? I didn’t think so. I haven’t. Reggae doesn’t count, because usually Reggae starts on the ‘and’ as opposed to the ‘1.’ However, if you want to practice using the concept of arrow/strumming patterns, this one might help you learn to sight read the pattern that is ‘called for’ on a given song…if you find one that uses it. If not…at least you learned a new pattern.
Pattern 6 – U, U, D, D, U, U, D, D is another pattern that will help you learn to sight read strumming patterns, but will more than likely never be used. If you are noticing a correlation between a song starting on the ‘up’ being rather uncommon, you’re right.
There are rare instances when a song starts on the ‘up’ and as I look back on over 280 songs (plus hundreds more that I haven’t produced for an E-Z Strummer series) I DO NOT recall one single time that I have ever used an ‘up’ pattern to start a song. As a matter of fact, I pretty much use the same template for strumming patterns OVER and OVER and OVER and OVER….(and over) again with a majority of the songs I play. I’ll prove it to you in just a second.
There are far, far more patterns that can be developed outside the basic up and down pattern as well, which is the point of practicing these types of patterns. The variety of potential patterns expands greatly by being able to perform up and down strokes on demand in any necessary rhythmic position.
Putting It All Into Action
Before I start showing you examples of songs, I want to introduce you to some additional patterns that are quite basic, but are used quite often. You’ll be able to play along with the audio provided using ‘slash’ sheets. Slash sheets are used as a simple way of practicing strumming patterns. The slash in the exercise indicates the number of times you are to strum a given chord. The tempo doesn’t matter. To be honest…the strumming pattern doesn’t even matter. ALL THAT MATTERS IS THAT YOU CHANGE CHORDS AT THE RIGHT TIME. Notice I used all capitals. It indicates emphasis, and here’s why:
When learning to strum the guitar as a whole, all you are really learning is prep work for learning to play a song. Why in the world learn how to strum if that isn’t the plan, right? In that case, what is usually most common with all songs? Lyrics and chords. So, in theory all you really have to know in order to strum a song are the lyrics and chords. I know it may seem impossible to think of in that way at first, but I think you’ll understand in a moment.