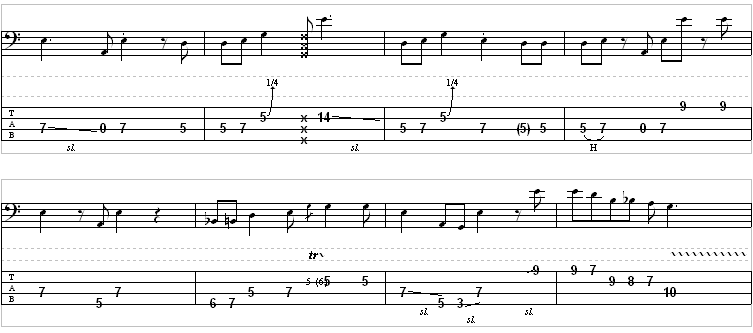
“Have A Cigar” is found on the album “Wish You Were Here,” and this album was dedicated to the original frontman Syd Barrett. Barrett began to lose his interest in life, music, and his band. This album was meant to be an inspiration for him to get back into the swing of things, but somehow the album fell on deaf ears. The band’s eclectic mix of ethereal music and tongue-in-cheek humor (“and by the way, which one’s pink?”) made them what we still think of today-a band to awaken you, and band to inspire you, and arguably a band that can make you lose your mind. Their music was meant to sound under the influence, and their light shows were justifiably out of this world. David Gilmour finally got his shot and produced his most lyrical guitar playing ever.
Intro
Guitar
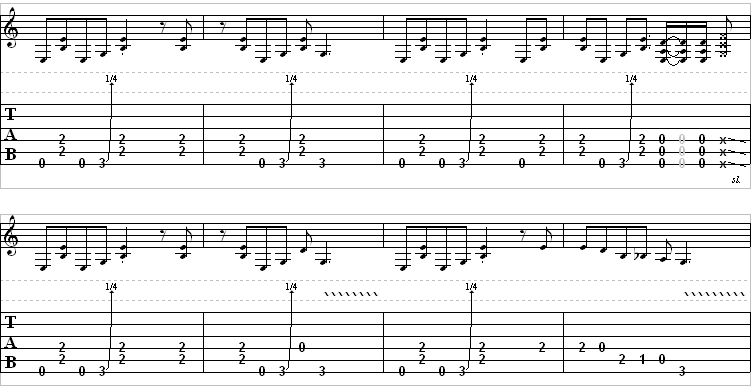
How To Play It
Part 1
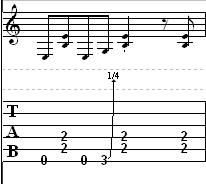
We start the song off in the position of Em with an emphasis in a transcending G. When you begin, place your fingers in an Em formation. Probably the most comfortable way to play the Em IN THIS SONG is by barring your 1st finger on the “A” string and the “D” string. For the first note, allow the “E” string to be played openly (hence the “zero” on the “E” string ) and follow directly into the Em chord formation. You then go back to the first note that you played ( the “zero” on the “E” string ) . Now, here is a tricky little part. You will need to use your 2nd finger to the “E” string and bend the note on the third fret a quarter note. As you see in the notation you will go directly back to the Em chord and will be played twice before the next phrase.
Part 2
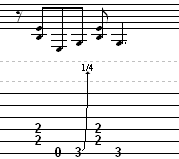
Notice how this part isn’t too much different than the part before,
but there is more emphasis on the “E” strings third fret. Begin
this part ( phrase 2 ) by going directly into the Em chord, and proceed to play the “zero” on the “E” string. If you will look back on part 1 you will notice that you are doing exactly the opposite in the second phrase that you were doing in the first phrase, as far as when you play the open string. In phrase 1 you went from the open to the Em chord. In phrase 2 you are going from the Em chord into an open string. After the open ( or “zero” string ) note play the “E” string as you did in phrase 1 on the third fret and bend a quarter note. After bending, proceed into the Em chord again and then just play that third fret note on the “E” string again without bending it. Not too bad. Just remember it is a bit repetitive and focuses on the Em and G formation.
Part 3

Take a look at the tablature for a second. It is the same as the opening riff. The only difference here is that after you play the bend on the third fret and go to the Em chord, you will throw in an open note on the “E” string and back into the Em. That is the only difference. Probably the best bet is to focus on part 1 until yo have that and you may find yourself subconsciously playing that open string. Just remember to save that for this part and you will have the song accurately.
Part 4
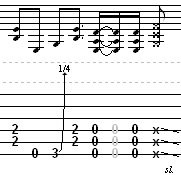
Ok, in this phrasing you may be a little leary, but it isn’t that bad. Just remember where to focus your fret hand. ( Em, G area ) Begin this phrase in the Em formation, then go to that open string on the “E” that seems to be making its presence a little more known every phrase. After that, you will once again bend that third fret on the “E” string AGAIN a quarter note. Take note of this. You will be using it the entire lesson on that third fret. Then, you will need to play that Em chord formation again, but after that, you will have a bit of a crazy little break from the repetitive structure of the song. Now, after that last Em formation, let the open notes ring on your “E” string, “A” string, and “D” string approximately three times. Notice that on that the second time allowing the open strings to play the numbers are highlighted. They are highlighted because you will need to pull off a bit when you play it. This will keep you in time a little better. After that, go ahead and allow the open strings to ring again. Here is the first sign of the song being a little different than the rest. The three “x”s that you see on the “E” string, the “A” string, and the “D” string are meant to be “rakes.” A rake is when you scrape your pick or finger ( pick recommended) across the noted strings. Now, look behind the “x”s. You will see a downward slash behind it. What that notation is asking you to do is “rake” the strings and lightly let off of the fret’s neck and slide your fingers in a descending fashion. Now practice that part a few times.
Part 5
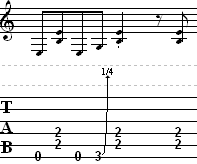
This part is played exactly the same way as part 1. Go ahead and try to practice parts 1-4 together. If you feel that you did ok then proceed to part 6.
Part 6
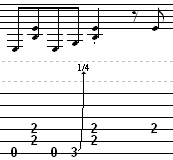
This part is much like that of part 2. The only real difference is that after bending that quarter note on the third fret and going into the Em chord again, just simply let off all strings and play the “D” string openly. Look very closely a little after the third fret tablature and up near the actual notes of the song. There is a ribbon-like string up there. That signals that on that third fret note on the “E” string, you will need to vibrate that note rapidly. This is done by “shaking” the string and accenting the note with your pick or finger about every other pull of the string. That will keep you safe and will keep that note from fading away into obscurity. You just played a “vibrato.” Good job.
Part 7

This part is almost identical to the first part that you learned. The only slight difference is that you do not need to play a full Em chord at the end of the phrase. Just simply play the second fret on the “D” string and there you go.
Part 8

Ok, here is the last part of the lesson, and a relatively simple part also. It is, however, different than the rest of the lesson. What you are going to want to do is play the second fret on the “D” string, then play it open. Then descend to the “A” string and play the second fret, then the first, and then the open string. Finally, hit that “E” string on the third fret and shake that string a bit to create the “vibrato” that we learned earlier.
Bass Guitar
