Difficulty: Easy
This song is actually easier to play when you listen to it, as opposed to
trying to read it. A song played by John Frusciante MUST be felt to get the idea. He plays sporadic notes, which is sometimes easy, and sometimes hard.
Listen to the full solo:
Solo
Ok. We aren’t going to talk much about dotted notes here, simply because this song’s lead is so easy to hear, you don’t need to time it as much. The arrangement below make look strange, since it only covers seven measures, but you’ll understand why it is broken down this way in a second.
Measures 1-4: You will immediately start out playing, so be ready. The first four measures are actually just repeats of themselves, minus the three times you play the 11th fret on the G string at the end of the fourth measure.
Here’s a snapshot on how to position your fingers:
Usually, when bending a string, you want to also use your 1st and 3rd fingers IN FRONT of the bend on the same string to guarantee that you will bend the string with more emphasis. In this case, you can choose to do what you want. It’s harder to bring your 1st and 2nd finger to the G string in front of your 3rd finger in this case, and then put them right back. Also, since the full bend is on the 11th fret, you should be able to play it using just your 3rd finger.
Now, after you have played the 11th fret bend, you will need to hold it one whole rest. By listening to the audio, you’ll see how easy it really is. Then, you will just play the same thing again. This time however, you will need to play the notes on the 11th fret three times to move into the fifth measure. The “light colored” notes that you see throughout this song are basically ghost notes in essence. They are also there to help you keep the time between note changes.

The measures below are a little trickier.
The fifth measure is brisk, so be ready for it. You will be performing
a “pull-off” in this measure. If you have properly positioned your 3rd
finger, then the pull-off won’t be hard. You simply pull-off from your
3rd finger to your 1st finger. Then, you will be able to use your 3rd finger again to play the notes on the 11th fret of the D string. After that, you simply use your 1st finger again to play the 9th fret, then back to the 11th fret.
The sixth measure contains a “triplet.” Instead of going into too much detail about a triplet, and then confusing you, let’s just use a simple concept. Triplet simply means “three.” So, you will count as followed : 1-2-3. In this case, you will hear how it sounds in the audio, and won’t be able to miss it. Once again, you are following the basic rule of thumb in fingerings that you have seen above.
The seventh measure is really easy, but you have to move a bit more. For now, stop at the end of this measure when you are done, and we’ll explain what comes next.

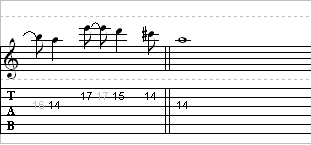
What you see below is a measure with no fretted number. Or is there? Look above and see that you ended on the 14th fret of the “High E” string. The measure below is telling us to hold that note, applying vibrato. You may know this, but vibrato is performed by rapidly shaking the string that the note is on. When you listen to the audio, you’ll see that it provides us with a “longing” sound, begging to come back in with the lead. That’s what we are going to do!
The ninth measure starts out with the same two notes you began with, but Frusciante switches it up on you a little. Once again, if you keep your fingers as you did starting out, you should be able to play it like this:
This is when using your 1st, 2nd, and 3rd finger to bend is a necessity. Practice that pattern with your fingers and you’ll notice one thing. Not only is it a little hard to bend that 14th fret with your 4th finger, but it’s also hard to even reach the darn thing! That’s when using your other fingers come in. You will need to simply bring your 2nd finger to the “High E” string, since your 1st and 3rd fingers should already be there. It doesn’t matter WHERE you put those three fingers, but just make sure you use them. Then, bend with your 1st, 2nd, 3rd, and 4th fingers. (Of course, your 4th finger is actually harboring the note.) You’ll need to bend that up one full step, and then bring it back down to it’s natural note on the 14th fret. You’ll also see a rest at the end of the tenth measure.
The eleventh measure is probably where you notice the most influential hook in the song. It really brings the solo to an end.
In this measure, you will need to bring those fingers very close together. This is more of a fill than a lead right here.
Take a look at the fingerings:
Now, move on to:
Next you will see a few bends. Keeping your fingers in the same position as you did above is crucial as well. Here, you will have an easy point-of-reference to begin your bends.
Take a look:
Here you will not need to use your 1st and 2nd fingers to bend, as it is
very difficult. Since it’s so high in pitch, it should bend without much
worry. Do NOT bend the 14th fret. It’s not called for. The tab only needs the bend on the 16th fret. This is a rather tricky concept, but just try it as best as you can.
There’s a total of three bends on the 16th fret, and then…..we bend again!
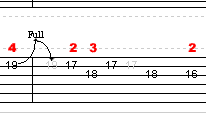
Here’s where your other fingers come into play again. Remember, use your 1st and 2nd fingers to aid in the bend on the 19th fret. Place your 2nd finger as a starting point for the next note on the 17th fret. If you do this, then by looking at the tablature with fingerings above, you will be able to simply place your 3rd finger on the 18th fret. If you bent the string correctly, you should have been able to keep your 2nd finger anchored
to play the 17th fret.

The measures below end the solo. The audio does NOT include the turn-around note at the very end. It only includes the first of the measure below. If you kept your fingers as shown above, then all you have to do is:


