
Difficulty: Intermediate
Composer – Bob Dylan
Where to find this song – Electric Ladyland
track #15
Release Date – October 1968
In his brief four-year reign, Jimi Hendrix expanded the electric guitar more than anyone before or since. Hendrix was a master at merging all manner of music into one precise art form, often with experiments that produced high-quality feedback and roaring distortion. His frequent hurricane blasts of noise and dazzling showmanship proved that he could and would play behind his back and with his teeth and set his guitar on fire, and everyone would HAVE to love it. He posessed such considerable gifts as a songwriter, singer, and master of blues, R&B, and rock styles.
Riff Overview
The Rhythm Guitar
This is the part of the riff that most people are comfortable with because it deals with barre chords. The lead part is much more difficult. Here is how to play the rhythm part: ( On the rhythm part you will not need to change the arrangements of your fingers at all. You will just simply be moving up and down the fret board.).
The Lead Guitar Part
The lead part includes (as always the case with Hendrix) some excellent phrasing:
Take a listen to it all together:
How To Play It
Rhythm Guitar
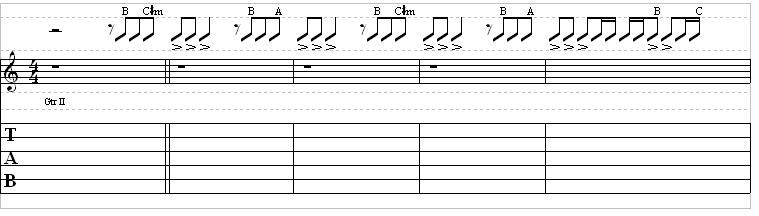
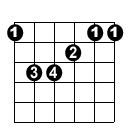
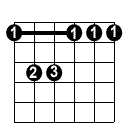
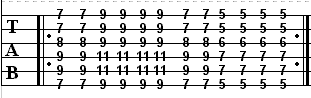
Begin this riff by barring your 1st finger over the seventh fret on all strings. Place your 2nd finger on the eighth fret on the “G” string. Place your 3rd and 4th fingers in any order on the “A” string and the “D” string. That is a barre chord. Play that a few times and move to the ninth fret on the “low E” string with all fingers still in the same arrangement. Play that a few times. Then just move back to where you just were and play that a few times. Last, go to the fifth fret on the “low E” string and keep all fingers in the same arrangement.
That is the rhythm guitar part. Those progressions are based on E style barre chords (major and minor). Here’s what the patterns look like on a chord diagram:
Major
Minor
If we tabbed out the chord progression to the rhythm
part, it would look something like this:
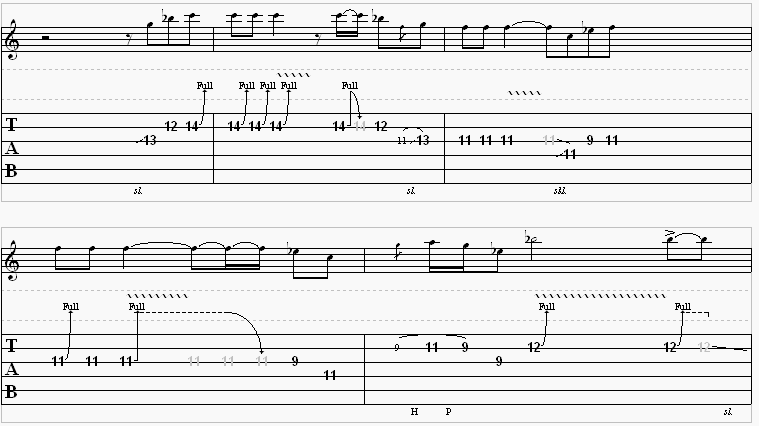
Lead Guitar
Part 1
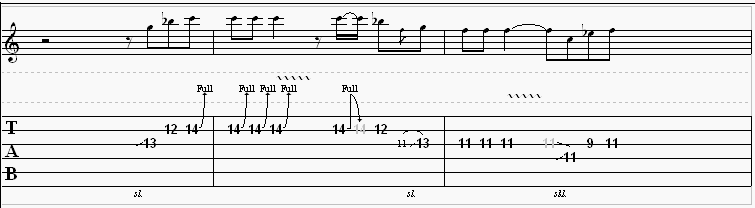
Begin this riff by sliding from the nut end of the
guitar down to the thirteenth fret on the “G” string.
Use your 2nd finger for this. Then, use your 1st
finger to play the twelfth note on the “B” string.
Next, you will be performing the bend. Use your 1st
and 2nd finger to do this. Perform that four times,
and shake the string ( vibrato – probably latin for “vibrate.” )
Next you will just be letting the full note bend
back down and going back to the twelfth fret with
your 1st finger. Notice that the vertical line on
the fourteenth fret on the “B” string goes
back down. That just signifies that you are releasing
the bend.
Next you will need to go to the “G” string
on the eleventh fret with your 1st finger. Slide
to the thirteenth fret, and then move to the eleventh
fret. Play the eleventh fret a few times for accurate
timing.
Part 2:
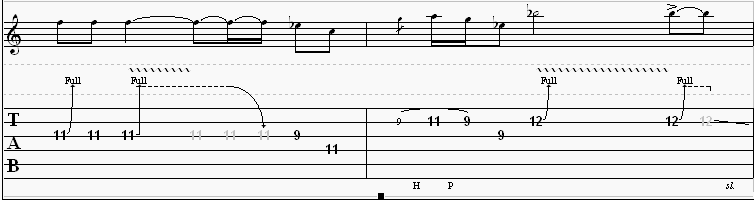
The next part of the riff is much the same as the
first part that you just learned. There are no different “effects” that
you haven’t already learned from the past, except
for a pull-off. If you can perform a hammer-on, you
can perform a pull-off. Just think – they are polar
opposites of each other. Begin this part by doing
EVERYTHING BUT THE AMOUNT OF TIMES ON THE BEND the
same way as before, until you get to the eleventh
fret on the “D” string ( use your 2nd finger).
( The best bet here is just to listen over and over
to get the feel of it.)
Now that you are there, use your 1st finger on
the ninth fret on the “B” string. Hammer-on
to the eleventh fret on the same string with your
2nd or 3rd finger, basing the arrangement on comfort
for you. Then, WITHOUT picking again, simply use
your 1st finger to go back to the ninth fret on the
same string. You just performed a pull-off WITHIN
a hammer-on. Good work! Now, you are almost finished.
For the next note, just use your 1st finger on the
ninth fret on the “G” string, and then
bend the twelfth fret on the “B” string
with your 3rd or 4th finger. Perform the same bend
on the 12 fret, and perform a slide on the fret toward
the first fret of the neck. Don’t forget about the
vibratos in between there. YOU ARE FINISHED!!!!!!
Lead Guitar Glossary:
Slide : playing a string
and allowing your finger to slide on the string lightly
to the desired tabbed location. Demonstrated with
an “S” on the tablature and/or a horizontal
line IN the tablature above the strings.
Hammer-on : moving from
a lower note to a higher note, only striking the
first note. Demonstrated with an “H” on
the tablature.
Full bend : this is when
you will bend the desired string equal to two frets
from the tabbed note you are bending from. Demonstrated
with a “full” above the vertical line.
Pull-off : moving from
a higher note to a lower note, only striking the
first note. Demonstrated with a “P” on
the tablature.
Vibrato : rapidly shaking
the string(s) being played. This “effect” looks
like a ribbon above the tablature.
All Along The Watchtower Tab
Complete Transcription To “All Along The Watchtower” (PDF)
Complete Transcription To “All Along The Watchtower” (Power Tab)